Function keys are the keys on the top row of your keyboard, from F1 to F12. They can perform various tasks, such as adjusting the volume, brightness, or keyboard backlight, launching applications, or accessing system settings. They can also be used in combination with other keys, such as Ctrl, Alt, or Shift, to perform shortcuts.
But are you frustrated by your function keys not working on your Windows 11 device? Do you miss being able to adjust the sound, brightness, and camera settings with a simple press of a button? If so, you’re not alone. Many Windows 11 users have reported that their function keys stopped working after installing a recent update.
But don’t worry, there’s a solution for that. In fact, there are several solutions that can help you restore the functionality of your function keys. In this article, I’ll show you the best and easiest ways to fix this annoying issue. By the time you finish reading this article, you’ll be able to use your function keys again without any hassle.
So, grab a cup of coffee and relax while you read this article. I promise you won’t regret it. And don’t skip any part because you might miss something important.
What Causes Function Keys Not Working in Windows 11?
Before we get to the fixes, let’s understand what causes this problem in the first place. There are several possible reasons why your function keys may not work on your Windows 11 device. Some of the most common ones are:
- Function lock: Some keyboards have a function lock key that toggles the function keys on and off. If you accidentally press this key, you may disable the function keys without realizing it.
- Keyboard driver: The keyboard driver is the software that allows your keyboard to communicate with your device. If the driver is outdated, corrupted, or incompatible, it may prevent the function keys from working properly.
- Windows update: Sometimes, a Windows update may change some settings or install some components that interfere with the function keys. This may happen especially if the update is not fully compatible with your device or keyboard model.
- Hardware issue: In rare cases, there may be a physical problem with your keyboard or device that affects the function keys. For example, the keyboard cable may be loose, damaged, or disconnected. Or the keyboard itself may be faulty or worn out.
How to Fix Function Keys Not Working on Windows 11?
Now that you know the possible causes of the problem, let’s see how to fix it. Here are the top fixes you can try when the function keys stop working on your Windows 11 device. You don’t have to try them all, just work your way down the list until you find the one that works for you.
NOTE: Check your keyboard: Before you try anything else, make sure that your keyboard is working properly. Try pressing other keys and see if they respond. Also, check that the cables are well-attached and that all other external peripherals are in good working condition. If you’re using an external keyboard, try connecting it to another device and see if the function keys work there. If the keyboard is faulty, you may need to replace it.
Solution 1: Toggle the Function Lock
The first thing you should check is whether you have enabled the function lock on your keyboard. The function lock is a feature that allows you to switch between the primary and secondary actions of the function keys. When the function lock is on, you can use the function keys without pressing the Fn key. When the function lock is off, you need to press the Fn key to use the secondary actions of the function keys.
To lock or unlock or enable or disable the Fn key, you need to press a dedicated key or combination of keys on your keyboard. The dedicated key or combination of keys may vary depending on your keyboard model, but it is usually Fn Lock, F Lock or F Mode for dedicated keys (It may also have a padlock icon on it) or Fn + Esc, Fn + F1, or Fn + F11 with combinations keys. The key is often located on the Esc key, but it may also be on other keys. You may also see a light indicator on your keyboard that shows whether the Fn key is locked or not.
Here are some Keyboard Model with Function Lock Keys
| Keyboard Model | Function Lock Key |
| HP | Fn + Esc |
| Dell | Fn + F1 |
| Lenovo | Fn + F11 |
| Asus | Fn + F9 |
To fix your function keys not working in Windows 11, try pressing the function lock key once and see if that solves the problem. If not, try pressing it again and check if the function keys work as expected.
Solution 2: Update, Uninstall or Reinstall your Keyboard Drivers
You need to do is make sure your keyboard driver is up to date. This is the software that tells your computer how to communicate with your keyboard. If it’s outdated or corrupted, it can cause your function keys to act weirdly or not at all.
If updating your keyboard driver didn’t work, you can try uninstalling and reinstalling it. This will remove any corrupted or incompatible files and replace them with fresh ones.
you can easily update or reinstall your keyboard drivers on Windows 11 and fix the function keys issue. Here are the steps you need to follow:
- Step 1: you need to open the Device Manager. You can do this by right-clicking on the Start menu and clicking on Device Manager. Alternatively, you can press Windows Key + X and select Device Manager from the menu.
- Step 2:, you need to find your keyboard driver. You can do this by expanding the Keyboard category and right-clicking on your keyboard. You should see two options: Update driver and Uninstall device.
- Step 3: If you want to update your driver, click on Update driver and then choose Search automatically for drivers. Windows will search for the latest driver for your keyboard and install it for you. You may need to restart your computer for the changes to take effect.
- Step 4: If you want to reinstall your driver, click on Uninstall device and confirm your choice. Windows will remove your keyboard driver from your device. Then, you need to restart your computer and open the Device Manager again. Click on the Scan for hardware changes icon and Windows will detect your keyboard and install the driver for you.
After updating or reinstalling your keyboard driver, you should be able to use the function keys on your Windows 11 device. To check if they are working, you can try to perform some of the actions that they are assigned to, such as adjusting the volume, brightness, or launching apps. You should see the corresponding changes on your screen or hear the feedback sounds.
Solution 3: Restart HidServ Service in Task Manager
You can fix your keyboard function keys by restarting and activating the Human Interface Devices Service, or HidServ for short. This service is responsible for making your hot buttons and remote controls work properly. If you’re having trouble with your input devices, this might be the solution you need.
The first thing you need to do is to restart the HidServ service in the Task Manager. This will refresh the service and hopefully fix any glitches. Here’s how to do it:
Step 1: Type Task Manager in Windows Search and open the app.
Step 2: Select the Services tab on the left and find HidServ service or directly search for it in the Task Manager search bar.
Step 3: Once located, right-click on it and select Restart.

That’s it! You’ve just restarted the HidServ service. Now, let’s see how to activate it.
Solution 4: Activate HidServ Service in Computer Management
The next thing you need to do is to activate the HidServ service in the Computer Management. This will ensure that the service is running automatically and smoothly. Here’s how to do it:
Step 1: Right-click on Windows start menu and double-click on Computer management.

Step 2: On the left pane, expand Services and application and double click on Services.
Step 3: Move to the right-hand pane and locate Human Interface Device services.
Step 4: Right-click on it and select Properties.

Step 5: Navigate to the Service status and confirm that it’s set on the Started option. If not, then tap Start.
Step 6: Move back up, locate the Startup type, and set it to Automatic.
Step 7: Click Apply, then OK to effect the changes.

That’s it! You’ve just activated the HidServ service. Now, you can restart your PC and check if your function keys are working correctly.
Solution 5: Turn off the Filter Keys
The next step you can try is to disable the filter keys feature. This can help you restore the normal sensitivity of the keyboard and the function keys. To do this, follow these steps:
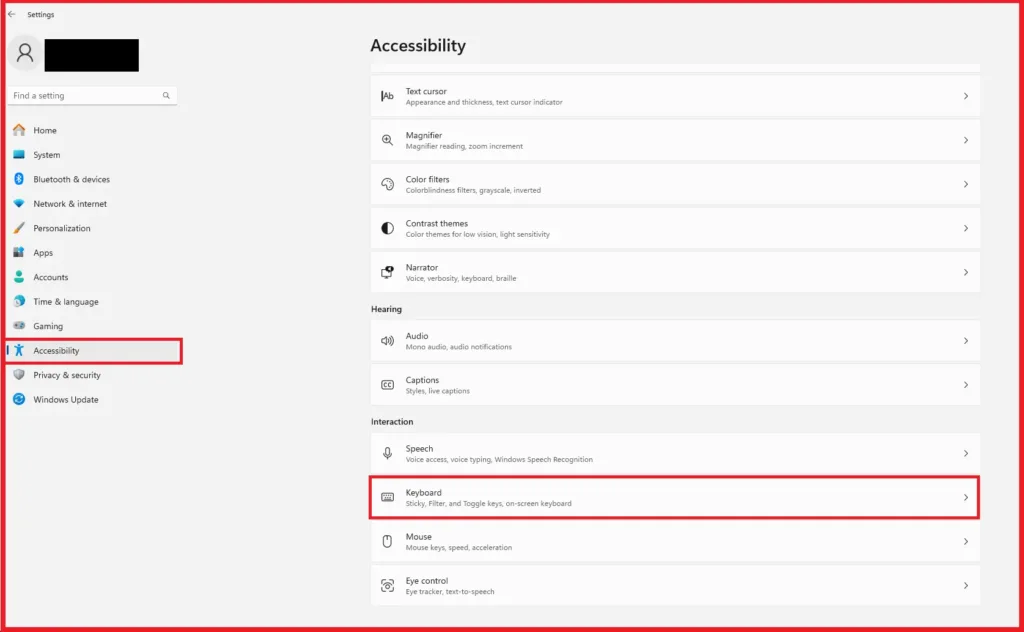
Step 1: Press the Windows key + I key to open the Settings app.
Step 2: Click on Accessibility on the side bar and select the Keyboard option (in Windows 10, click on Ease of Access and select the Keyboard under interaction section).
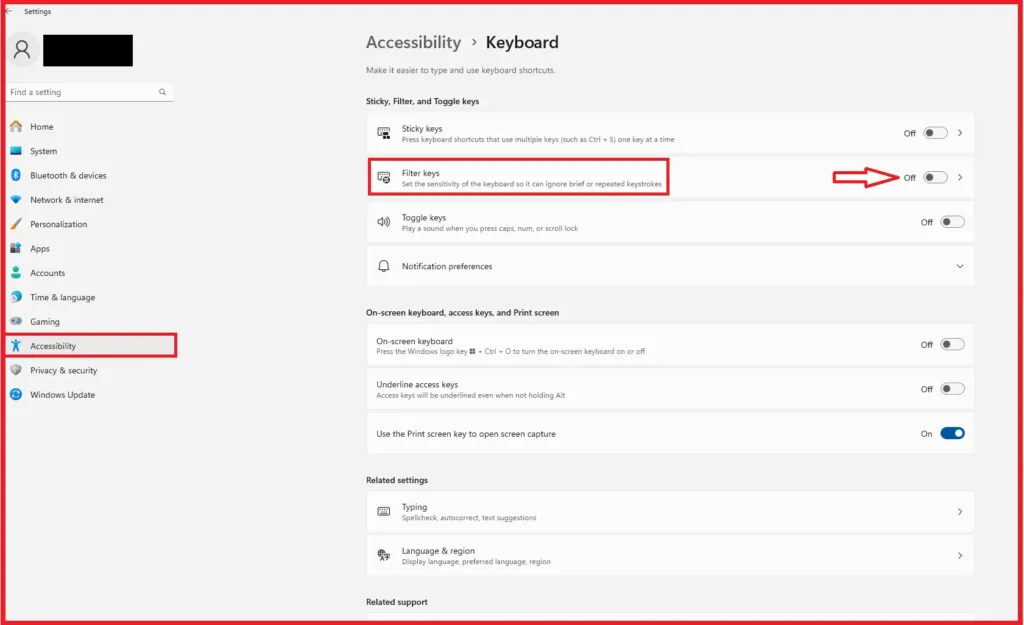
Step 3: On the following page, click the toggle for the Filter keys option to disable it.
Step 4: Check if the function keys are working.
Alternatively, you can also do,
- Step 1: Search Control Panel in the Start menu or Press Windows key + R key together to open run, type control panel in it and click open it.
- Step 2: In the Control Panel, Click on the Ease of Access, Ease Of Access Center.
- Step 3: Now, Click on Make the keyboard easier to use under the Explore all settings.
- Step 4: Filter Keys option will be here, now if it is checked, unchecked “Turn on Filter Keys” Checkbox. Apply and close the window.
Filter keys are used to avoid repetitive keystrokes in windows. Now check if the fn keys are working.
Solution 6: Fix Function Keys Not Working in Specific Apps and Games
Sometimes, Fn key don’t work as expected in certain apps or games. Why is that? Here are two possible causes and solutions:
- The app or game has its own function key settings. Some apps or games use function keys for their own purposes, such as opening menus, switching views, or performing actions. This can override the default function of the key. To fix this, you need to change the app or game settings and make sure no function keys are assigned to anything else.
- You have a custom key mapping for the app or game. If you use a key mapping software, you can create custom hotkeys for different apps or games. This can be useful for creating shortcuts or macros. But it can also interfere with the function keys. To fix this, you need to reset the key mapping for the app or game and remove any hotkeys that involve function keys.
Solution 7: Clean Your Keyboard
One of the simplest and most effective ways to fix your function keys is to clean your keyboard. Dust, dirt, crumbs, and other debris can get stuck under the keys and prevent them from working properly. This is especially true if you haven’t cleaned your keyboard for a long time.
To clean your keyboard, you can follow these steps:
- Turn off your computer and unplug your keyboard (if it is external).
- Use a soft brush, a cotton swab, or a compressed air can to gently remove any dust and dirt from the keys and the gaps between them.
- If you have the skills and confidence to disassemble your keyboard, you can also take off the keycaps and clean the switches and the circuit board with a soft cloth and some rubbing alcohol. Be careful not to damage any components or wires.
- If you don’t want to do it yourself, you can also take your keyboard to a professional repair shop and ask them to clean it for you.
- After cleaning your keyboard, plug it back in and turn on your computer. Check if your function keys are working now.
Solution 8: Use a Different Keyboard
Another possible reason why your function keys are not working is that your keyboard is damaged or faulty. This can happen due to wear and tear, water spillage, electrical surge, or physical impact. In this case, no matter what you do, your function keys will not work.
To confirm this, you can try using a different keyboard on your computer. If the function keys work fine on the new keyboard, then you know that the problem is with your old keyboard. You can either replace it with a new one or try to repair it if possible.
Solution 9: Change the USB Port for the Keyboard
If you are using an external keyboard, the problem may also be caused by a faulty or incompatible USB port. Sometimes, the USB port may not provide enough power or data transfer to the keyboard, resulting in malfunctioning keys.
To fix this, you can simply change the USB port for your keyboard. Try plugging it into a different port on your computer or use a USB hub or an extension cable. You can also try the keyboard on another computer to make sure it is not damaged.
Solution 10: Check If Your Function Keys Are Defective
Make sure your function keys are not broken or defective. Sometimes, a specific function key may stop working due to physical damage or wear and tear. To test this, you can use a keyboard testing website, such as KeyboardTester.com. Just follow these steps:
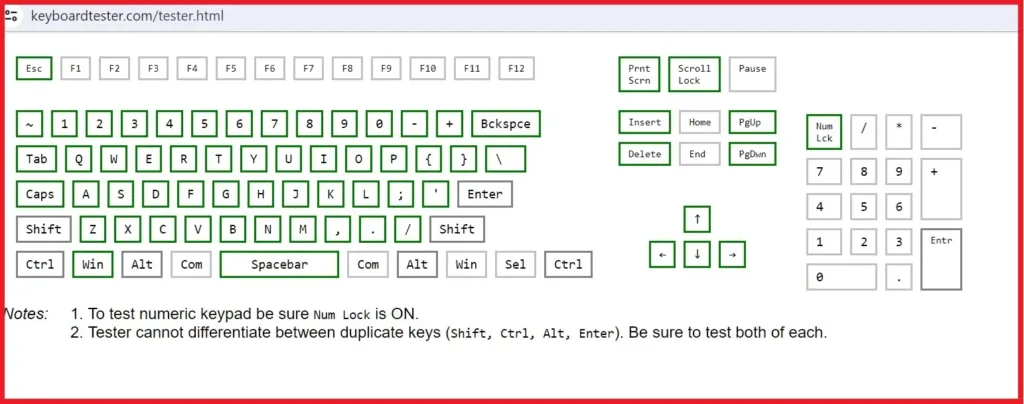
Step 1: Go to KeyboardTester.com and click on Launch the Tester.
Step 2: Press the function key that’s not working and see if it lights up on the virtual keyboard. If it doesn’t, it means the key is faulty.
Step 3: If the key is faulty, you’ll need to replace it or have it inspected by a technician. If you’re using a Windows 11 laptop, contact the customer support of the laptop brand and raise a ticket regarding the issue. If your laptop is under warranty, there is a good chance that the company will replace the keyboard of your device free of charge. On the other hand, if you’re using an external keyboard, contact the keyboard brand’s customer support and try to get a replacement, if the keyboard is still under warranty.
Step 4: If the key is not faulty, but still not working, it may be because you have remapped it. Read on to find out how to fix that.
Solution 11: Check the Keyboard Settings
If the function keys are working fine on the keyboard tester, but not in other applications, you may have accidentally remapped them or changed their settings. To fix this, you need to check the keyboard settings in Windows 11. Here are some things you can try:
- Step 1: Press the Windows key and type keyboard. Click on Keyboard settings.
- Step 2: Make sure that the “Use the F1-F12 keys as standard function keys” option is turned on. This will ensure that the function keys perform their default actions, such as adjusting the volume or brightness.
- Step 3: If you have a laptop with a Fn key, you may need to press it along with the function keys to activate them. Alternatively, you can enable the Fn lock feature, which allows you to use the function keys without pressing the Fn key. To do this, press and hold the Fn key and then press the Esc key. A lock icon will appear on the Fn key, indicating that the Fn lock is on.
- Step 4: If you have a keyboard with a F lock key, you may need to press it to toggle the function keys on and off. The F lock key is usually located near the F12 key or the Print Screen key. When the F lock is on, the function keys will work normally. When the F lock is off, the function keys will perform secondary functions, such as launching applications or opening menus.
Solution 12: Check Your Key Mapping Settings
Did you know that you can customize your keyboard layout and assign different functions to your keys? This can be useful if you want to optimize your workflow and productivity. However, it can also cause problems if you accidentally remap your function keys to something else.
To fix this, you need to check your key mapping settings and make sure that your function keys are not remapped. Here’s how:
- Open the software that you use for key mapping. This could be a dedicated program, such as SharpKeys or KeyTweak, or a built-in feature in some gaming keyboards or laptops.
- Look for any entries that involve function keys and delete or reset them. You may need to click on Apply or Save changes to confirm your changes.
- Restart your computer and test your function keys again.
If you don’t use any key mapping software, but someone else has access to your device, you should ask them if they have changed any key mapping settings. Some software allows administrators to remap keys for all users, which can affect your function keys as well.
Solution 13: Disable Keyboard Manager and Key Mapping Software
Sometimes, even if you don’t remap your function keys, they may still not work properly due to interference from other software. This can happen if you use keyboard manager or key mapping software that modifies your keyboard input or output.
To prevent this, you should temporarily disable your keyboard manager or key mapping software and see if that solves the problem. Here’s how:
- Right-click on the icon of your keyboard manager or key mapping software in the system tray and select Exit, Disable, or Close. If you don’t see the icon, you may need to open the Task Manager and end the process manually.
- Restart your computer and test your function keys again.
If you use general-purpose software that has a key mapping feature, such as AutoHotkey or Microsoft PowerToys, you should turn off this feature in the software settings.
Solution 14: Troubleshoot Your Computer
Sometimes, the problem may not be with your keyboard, but with your computer. There may be some software or hardware issues that interfere with the function keys. For example, there may be some outdated or corrupted drivers, some conflicting programs, some incorrect settings, or some malware infections.
To troubleshoot your computer, you can use the built-in troubleshooters that Windows provides. These are handy tools that can scan your system and fix some common problems automatically. You will need two troubleshooters for this: the Hardware and Devices troubleshooter and the Keyboard troubleshooter.
Here is how to use them:
- If you are using an older version of Windows, you can access the Hardware and Devices troubleshooter through the Control Panel. Just go to Control Panel > Troubleshooting > Hardware and Sound > Hardware and Devices and click on Next.
- If you are using Windows 11 or 10, you will need to use the Command Prompt to launch the Hardware and Devices troubleshooter. To do this, go to Start and type CMD. Right-click on the Command Prompt and select Run as administrator. Then, type msdt.exe -id DeviceDiagnostic and press Enter. This will open the Hardware and Devices troubleshooter. Click on Next and follow the instructions.
- After running the Hardware and Devices troubleshooter, check if your function keys are working. If not, proceed to the Keyboard troubleshooter.
- To launch the Keyboard troubleshooter, go to Settings > System > Troubleshoot > Other troubleshooters. Find the Keyboard option and click on Run. This will open the Keyboard troubleshooter. Click on Next and follow the instructions.
- After running the Keyboard troubleshooter, check if your function keys are working. If not, you may need to try some other solutions.
Solution 15: Verify that Function Keys Are Not Disabled Through BIOS/UEFI Settings
The next thing you should check is whether you have disabled the function keys from the BIOS. The BIOS is a software that controls the basic functions of your computer, such as booting, hardware configuration, and security settings. The BIOS also allows you to change the settings of the function keys, such as whether they perform the primary or secondary actions by default.
To access the BIOS, you need to restart your computer and press a specific key during the startup process. The key may vary depending on your computer model, but it is usually F2, F10, F12, or Del. You may also see a message on the screen that tells you which key to press to enter the BIOS.
Once you enter the BIOS, you need to look for a menu or option that relates to the function keys. The menu or option may vary depending on your BIOS version, but it is usually called Function Key Behavior, Action Keys Mode, or Hotkey Mode. You may also find it under the Advanced, System Configuration, or Keyboard settings.
To fix your function keys not working in Windows 11, try changing the setting of the function keys to the opposite of what it is currently. For example, if it is set to Multimedia, change it to Function. If it is set to Function, change it to Multimedia. Then, save the changes and exit the BIOS. Restart your computer and check if the function keys work as expected.
| Computer Model | BIOS Key |
| Acer | F2 |
| Dell | F2 or F12 |
| HP | F10 |
| Lenovo | F1 or F2 |
| Toshiba | F2 or F12 |
Solution 16: Update Windows 11 OS
Updating Windows 11 is simple and straightforward. You just need to follow these steps:
- Step 1: Click on the Start button and select Settings. Alternatively, you can press Windows + I to open the Settings app.
- Step 2: In the Settings app, click on Windows Update in the left sidebar. This will open the Windows Update screen, where you can check for updates and install them.
- Step 3: Click on the Check for updates button and wait for Windows to scan for any available updates. If there are any updates, they will be displayed on the screen. You can see the details of each update by clicking on them.
- Step 4: Click on the Install now button to download and install the updates. Depending on the size and number of updates, this may take some time. You may also need to restart your computer to complete the installation.
- Step 5: After installing the updates, restart your computer if needed. Then, check if your function keys are working properly.
Why Updating Windows 11 Can Fix the Function Keys Issue
One of the possible reasons why your function keys are not working on Windows 11 is that you are running an outdated version of Windows 11. This may cause some glitches or bugs that affect the functionality of your keyboard and other hardware.
For example, some users have reported that their function keys stopped working after updating to Windows 11 build 22000.100. This was a bad update that introduced some issues with certain hardware keys and buttons, especially the function keys. Microsoft has not released an official list of affected devices, but it seems that they have fixed the issue with the subsequent updates, such as Windows 11 build 22000.120.
Therefore, if you are still on Windows 11 build 22000.100 or 22000.110, you should update your Windows 11 to the latest version as soon as possible. This may solve the function keys not working issue, as well as other problems that you may encounter with Windows 11.
Note: If you are prompted to restart your computer before installing all the updates, do so, but make sure to return to the Windows Update screen after the restart and resume the installation of the remaining updates. This will ensure that your Windows 11 is fully updated and optimized.
Solution 17: Roll back the Windows update:
If the problem started after installing a Windows update, you may need to roll back the update and wait for a more stable version. Sometimes, a Windows update may cause some issues with the function keys, especially if the update is not fully compatible with your device or keyboard model. To roll back the Windows update, follow these steps:
- Step 1: Press the Windows key + I and select Update & Security from the Settings app.
- Step 2: Click on Windows Update on the left pane and then click on Update history on the right pane.
- Step 3: Click on Uninstall updates and select the update that you want to uninstall. Click on Uninstall and follow the on-screen instructions.
- Step 4: Restart your device and see if the function keys work now.
Corrupted Lenovo Pointing Device Driver ( For Lenovo Users)
This driver is responsible for controlling the touchpad and the TrackPoint on your laptop. If it gets corrupted, it can interfere with the functionality of the function keys.
This is a well-known bug that was affecting Lenovo laptops on Windows 10 and it seems to have transitioned to the new Windows 11 too. Fortunately, there is a simple solution for this: uninstall the driver and let Windows Update reinstall it automatically.
Solution: Uninstall and Reinstall the Lenovo Pointing Device Driver
To uninstall and reinstall the Lenovo Pointing Device driver, follow these steps:
- Step 1: Press Windows key + R to open up a Run dialog box. Next, type
devmgmt.mscinside the text box, then press Ctrl + Shift + Enter or simple OK to open up Device Manager. - Step 2: Once you’re prompted by the User Account Control, click Yes to grant administrative privileges.
- Step 3: Once you’re inside Device Manager, expand the drop-down menu associated with Mice and other Pointing Devices.
- Step 4: Next, right-click on Lenovo Pointing device and choose Uninstall device from the context menu that just appeared.
- Step 5: At the confirmation prompt, click on Uninstall once again, then wait until the operation is complete.
- Step 6: Restart your PC and wait until the next startup is complete. During this next startup, your operating system will notice that the pointing device driver is missing and install a generic equivalent that will hopefully fix the issue for good.
That’s it! You should now be able to use the function keys on your Lenovo laptop without any problems.
Solution 18: Clean Install Official Windows 11 Release
If none of the instructions above have allowed you to fix the issue in your case and you’re on a development build, you should really think about making the transition to a stable release.
To clean install the official Windows 11 release, you’ll need to download the Windows 11 Installation Assistant and follow the on-screen instructions. This will download and install the latest version of Windows 11 on your laptop.
However, before you do this, make sure you meet the following requirements:
- Your laptop is compatible with Windows 11. You can check this using the PC Health Check app.
- You have a valid Windows 10 license. You can check this by going to Settings > Update & Security > Activation.
- You have backed up your files and settings. As mentioned earlier, a clean install will erase everything from your hard drive, so make sure you have a backup before you proceed.
Final Solution: Contact Customer Support
If none of the above solutions work, you may have a more serious issue with your keyboard hardware or software. In this case, you should contact the customer support of your keyboard or laptop brand and ask for help. They may be able to diagnose the problem and offer a solution or a replacement.
If your keyboard or laptop is still under warranty, you may be eligible for a free repair or replacement. To check your warranty status, you can visit the official website of your keyboard or laptop brand and enter your serial number or product ID.
Here are some links to the customer support pages of some popular keyboard and laptop brands:
- Dell
- HP
- Lenovo
- Logitech
- Microsoft
How to Prevent Function Keys Not Working in the Future
To prevent the function keys not working on your laptop in the future, here are some tips:
- Keep your Windows and drivers updated. This can help you avoid compatibility issues and bugs that can affect the function keys and other components of your laptop.
- Avoid installing untrusted or unnecessary software. Some software can interfere with the function keys or cause other problems on your laptop. Only install software from trusted sources and uninstall the ones that you don’t need or use.
- Scan your laptop for malware and viruses. These can also cause the function keys not working or other issues on your laptop. Use a reliable antivirus program and scan your laptop regularly.
- Backup your files and settings. In case the function keys not working or other issues become too severe, you may need to clean install Windows. This will erase all your data and settings from your hard drive, so make sure you have a backup before you do this.
Final Thought
That’s it. These are the best and easiest ways to fix the function keys not working on Windows 11. I hope this article helped you solve your problem and get your function keys back to normal. If you have any questions or suggestions, feel free to leave a comment below. I’d love to hear from you.
And if you liked this article, please share it with your friends and family who may also be facing this issue. You never know who might need it.